Category Archives: DIY REUPHOLSTERING

arm knitting, yarn, blanket, knitting, crochet blanket, gray blanket,

Arm Knitting Blanket Tutorial

I was browsing through YouTube and I found a video on arm knitting a blanket tutorial. I was a little confuse because how can you arm knit a blanket? I watched the video and I was so happy to see that you can actually do it in less than an hour! Usually I crochet and it take forever to finish anything. I have to little kiddos that I have to take care of and by the end of the night all I want to do is go to be and crocheting it the last thing on my mind. I was excited to start arm knitting especially for the video I was watching was the same pattern over and over again.

arm knitting, yarn, blanket, knitting, crochet blanket, gray blanket,

Well let me just tell you that it took me more than one hour to finish my first arm knitting blanket. Let me tell you it actually took me three days to finish my blanket. First I did not have the right kind of yarn. Then I kept dropping stitches, followed by running out of yarn! I just sat there with an arm full of yarn wondering how I was going to remove it from my arm and loosing a stitch. I did figure it out and just got a pool I had from a craft I never got around in doing.

arm knitting, arm knitting blanket, tutorial, pattern, knitting, crochet

I wont lie to you it got pretty frustrating at times and still the blanket did not come out the way I wanted it to. Because I removed it from my arm and I did not r ember which way it was originally on my arm. I changed the stitch direction. Its not supper noticeable but it much more difficult than I thought.

Here the video I did my arm knitting blanket tutorial. She is a very good teacher for sure.


Stay Crafty,


Loren


chalk paint, foot stool, upholstering, reupholstering

Footstool Reupholstering


A couple of months ago I found a footstool at Goodwill and I reupholstered it. At the time I has painted it white with white chalk paint and added new fabric. I also did a cute number stencil with a sharpie on the top. I always enjoy reupholstering and its one of my favorite hobbies. When I look at a piece of furniture I am always trying to figure out how its put together. I just could not help myself and do another footstool reupholstering again.

chalk paint, foot stool, upholstering, reupholstering
Continue reading

how-to-reupholster-a-foot-stool

Reupholster a footstool

On one of my ventures of going to goodwill I found a granny footstool for just $5! I could not believe it, I’ve been looking for one it seems like forever and here it was. It was just in my price budget and small enough to be carried right out the door with ease. Now the question was what kind of fabric I wanted to use to recover this lovely find so I took a trip to Joann’s one of my favorite craft store in hunt for the perfect fabric. I knew I wanted to have a rustic feel but still wanted to match everything in my home. As most of us know you can always find something at Joann’s that is just right what you are looking for.

Once I found the fabric, it was time to take the footstool apart. Reupholstering is one of my favorite hobbies and I always just want to rid things apart to see how things fit.
Once I removed the old fabric and foam it was time to replace it with new and improved fabric. I took the wood and measure out the foam to be the same size, followed by batting and fabric which I measured to wrapped around the wood to hold the foam place.
The fun part is about to begin, the stapling. I begin by stabling the center of each side, this helps hold everything in place.
Once everything is stapled I added black fabric to the outside to cover all the staples. I stapled neatly on the black fabric so it does not look all crazy like whats underneath.
When all the reupholstering is done on the footstool I began painting the stool. I used my own mixture of chalk paint on the stool. Once it was sealed, it was time to put it back together.
One last thing to do and that was to hand draw a N’2 on the fabric, for this task I used a gray sharpie. I bet no one has a stool like this in their home.
What will you be reupholstering today?!
stay crafty,

Loren


DIY-how-to-reupholster-a-chair

How to reupholster a chair tips from a DIYer

Reupholstering a chair can be a daunting task especially if you have not done it before. However, if I can do it so can you! Today I have put together a few DIY tutorial that I have come across that are fantastic when trying to figure out how to reupholster a chair. 


The tutorial I will always refer back when reupholstering a wingback chair or any chair for that matter will be Booke from All things thifty. She has step by step tutorials and if you are wondering how much fabric you will need to reupholster that chair?  Well she has a great chart that you can use to refer to and it gives you an estimate of how much fabric you will need.


                                All Things Thrifty                                       Fabric Chart

One chair that keep haunting me in my sleep is a gorgeous teal char . I would love to get my hands on a chair like that for my home. Sometime a little luck goes along way. Her chair reupholstering inspire me to know that any ugly chair can be turned into a beautiful piece. 
Kojo Designs
Jenny from Little green notebook has a five step tutorial from star to finish on how to take a chair apart to attaching the fabric to the chair. The detail of the picture are fantastic, especially since I am a visual person and its very helpful. 
So let say you are still a little intimidated on reupholstering a chair? You can just buy a slipcover and make it glam like what Holly did from House of Holly. She just added decorative nails to add that extra touch. I could not tell that she used a slip cover, it looks that good.
Don’t forget to take a look at my reupholster chair tutorial I did last year! I have a step by step tutorial and if you have any question I would gladly answer them.
Stay Crafty!

Loren
original-chair

Recap of a reupholstering

One cloudy day we found this lonely, awkward looking chair by the dumpster. I just saw the potential and the beauty this chair could bring to my home. We took it in and wondered what we had gotten ourselves into! 
We knew nothing of reupholstering and we found more bad news as we when we removed the fabric!
All of the foam was dusty and by just looking at it the chair made me itch. We decided to remove very thing from the chair. All was left was the frame, nails and springs.
 
Then the long journey to reupholstering began. It took about a month of long nights and hard work to finish the chair. I looked at other blogs and I could not find references to help with the process. Most blogs  only had the before and after pics, so I decided to step by step tutorials for those who might need a little guidance in reupholstering.

 I go threw step by step on how we attached the foam to the frame. You can see my hubby hard at work. 

When all was said and done here it how it looks like with the foam was stapled to the frame. 

I think the easiest part of the chair was gluing the decorative trim to the chair.
I hope you all enjoy reading about my journey with taking this chair from blah to glam. After this chair I don’t think there is anything I can’t do! I can’t wait to hear what you all have to say.
Links to the tutorials
finaleofchair

Chair reupholstering Fabric Tutorial

Are you ready?!
Ta-Da!!

Do you love it? I decided to make this chair a sexy red velvet beauty. My hubby wanted a chair for himself since I use the other chair we reupholstered as my own and since his favorite color is red that’s what helped decide on the fabric. I purchased the fabric from Joann’s at 60% off during memorial weekend. Its home decor fabric which is more expensive but it’s wider. I spent $54 on 4 and half yards of fabric, since I had gotten a gift card for my bday for $15, I only spend $39 out of pocket.  Awesome deal right!?
The only things you will need for this part of the project will be a 
staple gun  
staples
scissors
Fabric and Trimm

I measured the fabric to be one piece to go around the entire back of the chair.

Then I folded the rigid edge toward the chair to make a fold. After that I (*Hubby Note* by I, she really means me) just stapled all around the top part of chair. 
All you do after that, since you have one piece of fabric, is to pull tight and staple a row of staples toward the center of the chair. Our chair has a little round bump toward the bottom.  

Once the lower center of the chair is stapled you staple the rest of the fabric under at the bottom of the frame. 

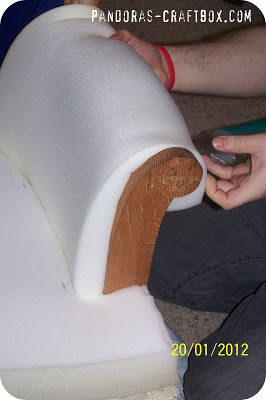
When I began the center of the chair I used two long pieces of fabric and I stapled it in between each foam piece. I was only able to staple at the top of the chair and the bottom because there is no wood in at the center of chair where the foam which is where you would rest your back against.

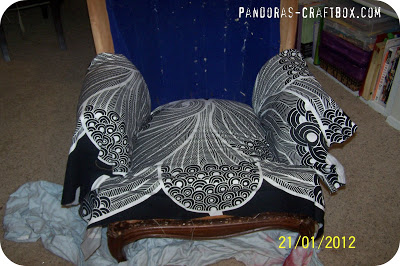
Now to do the top part of the fabric I cut little slits in the fabric where two different piece of foam meet.

Then I folded each side to hide the ridge edge and staple down. As you can see by the picture I should have done the center of the chair first because now I have extra fabric showing. This means that I had to remove all of the back fabric carefully as to not damage the fabric and re-staple it again once I finished the top part. Urgh…I was not very happy, but I learning as I go!

Now I had this long piece of fabric at each end of the chair. I pull the fabric tight and wrap it around the arm.

Once pulled tight I was able to staple it to the side of the frame.

I decided to do three folds at the top. I had to do this because of the way the arm is curved. Because the arm is curved it leaves extra fabric and this is the way I found that makes it look pretty. Now the hard part starts, I need to make the other arm look the same. I always have a hard time doing this. I find that one arm is always prettier than the other.

Remember in my last post i left the fabric of the old chair attached because there was no way to replace it. Well I just hand sewed on the new fabric to the other piece of fabric. I used U shape sewing needle. I bet there is some fancy name for it, but it just looks like a boomerang to me haha… but I digress. Then once it was sewn I pull it tight and stapled it to the bottom of the chair.

Can u believe I am still not done!
This was my favorite part, I now added the trim to the entire chair. I used two different trims and I used pre-cut and measured black rope trim from Joann’s. I spent most of my budget on the trim which is crazy! It made every thing look so much better.

Rope trim 7 yards - $18 with a 30% discount
Double rope trim 5 ( cut by the yard) -  $20 with a 50% coupon I use on different occasions

I place the single rope trim on the inside of the chair and I stapled it to the top and the bottom of the chair.

I also used a double rope trim to cover up were I stapled the single rope. I purchased the double rope to use every where else. It hides the staples very well and I did not have to use messy fabric glue.

Sexy, right!

The last part, and the one part that I hated doing, was sewing the cushion.
I am not very good at sewing and it takes me forever, but it needed to be done.

I use the original cushion fabric and I cut it up as a template. Then I started sewing it which took me about three hours to do. Yeah, I know, blah! I even recycled the zipper of the old cushion.

 I am very happy with the final product.  I really can’t believe that I did this chair mostly by myself. The hubby did help some when I needed some muscle or when I got stuck.

Total spent on a free chair was about $90.

I hope the tutorial was helpful and detailed. If you have any questions just let me know I love hearing from you guys. Trust me if I can do it with barely any knowledge of reupholstering so can you!

Till Next time,

Part of one of tutorial here
Click here to see all the wonderful Link Parties I attend!

chair-amp-footstool

Shadow Box redo to Footstool

I am so excited to show you what I did this weekend. I was up to 2 am doing this project all by myself! It almost sounds like a song, haha. Yep, I am a little corny.
I am rating this post

 I have had this shadow box for a couple of years and it has always been in the way. Its to big and bulky and it would never stay in place. Finally on Friday night I pick it up to place it somewhere else and it came to me. I’ve been looking for a footstool on craiglist, by the dumpster and The Salvation Army and I can’t find the right one. Why not make one? The stool is sturdy enough to handle the weight and big enough for my cute little tootsies. 
The first thing I did was run to home depot and get stool legs which I then stained. One piece of advice don’t start staining in 90 degree weather because the wood won’t have enough time to soak in the stain and will dry to fast.

While doing this project I learned something new which was the thread rod extends. I was not told that by the associate. Don’t get me wrong I like the the HD associates and they are very helpful and knowledgeable but this little piece of information would have sped up the process. Another associate did recommend a T-nut to be used to hold the stool legs in place. I was so happy he recommended it, forgive the blurriness as i intended to take a better one but… well you’ll see.

The T-nuts have little teeth at the bottom to dig in the wood to make sure the legs stay in place. First you will need to make the hole and then hammer the t-nuts in the hole. Then you can attach leg bottom. 

I cut a piece of airtrex foam chair pad to fit the top of the shadow box and then cut the Ikea fabric to cover the foam. 

Second piece of advice make sure you fold in the edge of the fabric so you have a nice hold. If not you will need to take out the staples and do the hold thing all over again, like I did. I had already started gluing the trim when I figured out what I did wrong. The glue I used was fabric glue and it dries clear so it was not a big problem.

At the center of the box I decide to use Ikea fabric to cover the T-nuts. 

Ta-Da!! I finished my footstool. If I wanted I could even attach the stool to the wall so it would not move. I have not decided if I want to remove the mounting hanger from it. 

I know you where wondering what book I am reading, right? Are you reading any of the same ones?
I hope you liked my journey from shadow box to footstool. Now to go read a book. If you want to see my tutorial on the matching chair Here
Link Parties I attend

foamforback

Chair Foam Reupholstering IV

 I am back with my chair! I did not think the chair was going to take me almost a month and half to complete. Its very detail intensive and time consuming. I could only work on the chair at night once my little monster went to bed and it takes two people to complete the chair and I had to make sure the hubby was free to help me.  However, it’s so worth it.  Its also not that hard to reupholster as it might seem. Let’s dive in, in the last post of Reupholstering chair part III we worked on the arms and now need to cover the back of the chair with foam. We used the same foam on the back of the chair that was used on cushion which is Airtex from Joann’s.
 
The foam was wrapped around the back of chair and stapled.  It took three of us to finish this task. Thank you Kristian for your help!
Ta-da! You see the hubby relaxing in the background after all was said and done.
Now on the last post we did the arms, but we had to redo them because they didn’t seem to have enough cushion on them.
We added one inch foam from Joann’s to the curve of the arm which was stapled and then an extra piece of foam to the arm rest and them covered it with another piece of larger foam. Click Here to see the past post.
On the back of the chair there was still a piece of foam missing since non of the foam I could find had the right dimesion to fit the chair. 

We took an extra left over piece from Airtex foam and cut it to fit the openning.

My hubby hard at work! He has been awesome with this chair and very supportive.
When my hubby finished, it looked something like this. We trimmed the foam a little bit more so it won’t have that little bulge and is not so noticeable.

Afterwards we covered the chair with batting to add some more softness.
We tucked in the foam around the back of the chair and from the underside. 
We decided to not staple the batting until we wanted to start stapling the fabric.

I wanted to thank you all for being so sweet and supportive about my chair! I can’t wait to show you the final result.
Here are the link to the other posts.
Hope to see you tomorrow with more Reupholstering and check out my blogger interviews going on now. 
Link parties Friday
Freckled Laundry
Making Lemonade
Dwell on Joy 
Whipperberry 
My Romantic Home 
My Repurposed Life  
Creation Corner 
At the Picket Fence 
2805 

Saturday
To much time on my hands
Rustic Crafts
Show and tell saturday  

chairfoam1

Reupholstering Chair Part III

The chair has been a little daunting at times because we have never done a chair like this before but its really not that hard. You just need the right materials and a plan when tackling a chair. Time is another thing you need lot of, we have spent about 12 hours on this chair and we are still not done. Let’s get started with  another round of reupholstering. Today we added foam to the arms.We stapled the foam to the arms, the foam was just the right size and we did not have cut the foam.

I used regular density foam from airtex, I again went to Joann’s and purchased the foam that was on sale!

After the foam was added its time to add the batting on top of the foam. The reason I added the batting is to add that extra layer of softness. We did not staple the seat foam because it fit snuggled between the frame and the fabric will keep it in place once placed on the chair.

As you can see the layer below.
My hubby and I could not agree on the pattern for the chair. I wanted a flower fabric and he wanted a manly fabric. Finally the only fabric we agreed on was the black and white fabric from Ikea and luck for me again that it was on sale for $3.99 a yard. I purchased 5 1/2 yards with a little extra just in case I messed up, which I always do. When using pattern fabric we need to keep in mind the way you want the fabric to look on the chair. Trust me I messed up twice just trying to get the pattern just right for the seat of the chair. 

After the patterned was cut and we pressed it down between the batting and the frame of the chair.We are cutting each pattern as we go. We cut a little extra around each patterned to make sure their is enough to staple on the frame. Its better to have extra than less of.

Here how it should look after the fabric has been placed. 
Ta-da!!! I did the arms and seat cushion. Next time I will show you the back of the chair and how to place the fabric on the arms.

I wanted to thank you for your lovely comments and support! 
Till next time!

Link to Reupholstering Part I
  Reupholstering Part II

Link Parties

Feathered Nest Friday
Show and Tell Friday
Potpourri Friday

White Wednesday 

Catch as Catch Can

Be Inspired 
The sasse life 
kim-too much time o n my hands 
creation corner 
whipper berry 
freckled laundry 
dwellon joy 
my repurposed life
making lemonade blog 
2805 
at the picket fence 
delightful order 
mom on time out 
christinas adventures 
night owl crafting 
handy man crafty woman 
elizabeth and co. 
carolyns homework 
  a bowl full of lemons
the kurtz corner 
sugar bee crafts 
crafty confessions 
cozy home scenes 
cherished bliss 
knick of time interiors 
craft-o-maniac 
alderberry hill 
be different act normal 
i heart naptime
the kurtz corner  
savvy city farmer
Coastal Charm 
2012-01-14-25252015.00.20

Reupholstering Chair part II

I am back with part II of reupholstering! After taking a mini break from the chair, we went back to work on it.  
You can’t see it very well from the top picture but all the springs were gathered in the center due to wear. 
Once they where untangled I sewed the spring to the bottom webbing. I used wax thread to keep it in place. It took me about 2 hours to sew all 9 springs.

Then I placed burlap on top of the spring and stapled it to the wood frame of the chair.
I also sew the spring to the burlap as to not wear the fabric too much with time. 

Three hours later we started on the foam. I got the airtex foam at Joann’s for $15. They had a 50% off foam sale, which is very lucky for me since I needed so much of it. 

 
We measured the chair width and height and then the cutting began!

By this point we were exhausted and drained but we went on!

We measured and cut and finally the foam fit perfectly on the chair! 

I hope you all enjoy the tutorial, I am trying to show you all a lot of pictures just in case you have a similar chair that you are reupholstering. I have looked around at other blogs and they always have the before and after pictures but not much in between for reference. I hope this helps.
Here is the link to Reupholstering chair part I
Till later.

Link Parties

Feathered Nest Friday
Show and Tell Friday
Potpourri Friday

White Wednesday 

Catch as Catch Can

Be Inspired 
The sasse life 
kim-too much time o n my hands 
creation corner 
whipper berry 
freckled laundry 
dwellon joy 
my repurposed life
making lemonade blog 
2805 
at the picket fence 
delightful order 
mom on time out 
christinas adventures 
night owl crafting 
handy man crafty woman 
elizabeth and co. 
carolyns homework 
  a bowl full of lemons
the kurtz corner 
sugar bee crafts 
crafty confessions 
cozy home scenes 
cherished bliss 
knick of time interiors 
craft-o-maniac 
alderberry hill 
be different act normal 
i heart naptime
the kurtz corner 

Published with Blogger-droid v2.0.3